Image hosted by Photobucket.com

Thursday, March 31, 2005


Here they are, all ready to knit up. I started a bag for my daughter with the green. It's from Bags A Knitter's Dozen from XRX. The Liberty Version of the ZigZag bag which is made to make the most of variegated yarns. When it's far enough to see the pattern I'll post a picture. Posted by Hello

Here's another picture of the same batch. I've managed to talk a friend into letting me buy two more skeins of worsted weight off her so I can continue to dye without waiting for more yarn. Posted by Hello

This is a photo of my skeins ready to be balled up. The second from the left is fingering weight and the rest are worsted weight. Now I need to get out my new swift and ball it up so I can see how it's going to swatch up. Posted by Hello

Wednesday, March 30, 2005

A Little More Info on the Egg Dye Yarn Dyeing

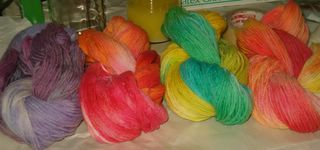
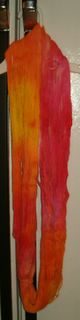
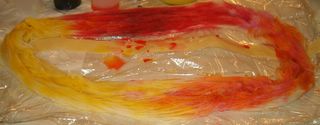
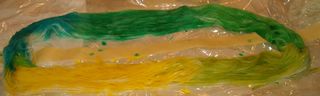
I used the basic concept from 
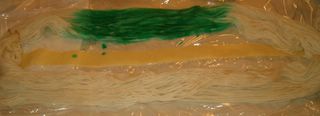
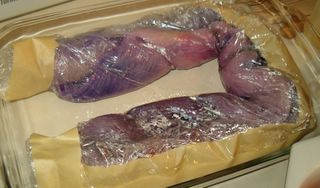
http://www.thepiper.com/fiberart/koolaid/basic-howto.html
I soaked the yarn first, I didn't time it like suggested in my Twisted Sister's Sock Workbook (which I highly recommend). I'm a mom of four children with not a lot of time. I have to fit my hobbies in between nursing the baby. I just accept that this isn't science and each batch will be different. I think of it as art. Who would want two identical paintings? Anywho, I learned after batch one to remove the excess water with a towel, otherwise the dyes run together. Then I place the yarn on two pieces of saran wrap with wide masking tape holding them together (not touching the yarn). Then I begin to squirt on color. When it's yuck, I cover it with another color being careful not to end up with brown. If the blue is too blue then add red or yellow. I read somewhere to add the closest color on the color wheel, probably Twisted Sister's. When my purple was too purple I added a touch of pink. I squirted all my colors on, rolled it up loosely, room for expansion during steaming. Only one packet exploded and it didn't make a mess. Then I did the 2 min in the microwave (power 7 for my microwave which is powerful) and then rested it for two until the dye bath was clear. In a previous post I put down how I mixed the dyes. If you have any questions you can email me.

This is the green worsted weight waiting to cool so I can rinse it. The real problem here is that 220 yds isn't really enough to make much and I didn't coordinate my colors. Guess I'll have to buy more yarn. Posted by Hello

This is the purple worsted weight waiting to cool so I can rinse it. Who needs sleep anyway? Posted by Hello

Here it is hanging to dry on my refridgerator. Posted by Hello

Remember how I said I would wait for morning to rinse. Well, I am not a patient woman. So here it is and I LOVE IT! I have no idea what it will look like when it is knitted up. Posted by Hello

Another skein of worsted weight from knitpicks. This time I did the warm colors. Posted by Hello

Close up of how the colors are applied. Posted by Hello

Shades of green before the microwave. Posted by Hello

The beginning of the dying of the shades of green. This is knitpicks worsted weight. Posted by Hello

Here's the purple after the baking and before the rinsing. I've read if you can leave it overnight, you'll have better results. I'm going to rinse it all in the morning. Posted by Hello

The Great Dye Event Continues

Okay, the bit about the masking tape is important. I sealed the yarn I did inside the saran wrap with some serious masking tape and I could tell the dye exhausted after two rounds of two minutes on/two minutes rest. I have a serious microwave so I have been doing the "cooking" on power level 7. This next batch is knitpicks yarn worsted weight and I used the purple paas dye. I did a long segment full strength and then started watering it down. Then I put on some blue and said "Yuck!". So I put some red in with the blue and covered up the yuck. Looks like this method is mighty forgiving. Next I mixed the blue with the pink. I got a beautiful blueberry color but it was "Yuck!" with the purple so I once again added red and covered it up. I was too excited to remember to take a picture. The only reason I managed a picture with the warm colors was because my husband happened into the kitchen and said, "I thought you were going to take pictures." I'll try harder next batch.

This is some of the yellow section. Posted by Hello

The dyeing has commenced. I am using knitpicks fingering weight yarn to dye and paas Easter Egg dyes.  Posted by Hello

Dying with Easter Egg Dyes

I have begun my experiments with Easter Egg dyes and wool. Skein number one is fingering weight yarn dyed in yellow, red, orange and pink Easter egg dyes. The pink is one tablet, two ounces vinegar and 6 oz water. Red, orange and yellow is two tablets, two ounces of vinegar and 6 ounces of water. I squirted the color on with squirt bottles from Wal-Mart. The mason jars were purchased from Hobby Lobby to mix the dyes in. I was doing approx. 6" areas. In the end I smushed it together so the areas would bleed together more. I wrapped it in saran wrap and cooked it in the microwave for 2 min on, 2 min rest a couple of cycles. My saran wrap didn't seal all the way so some of the dye came out. That makes it hard to tell if the dye is clear as it is sitting in colored water. I'm hoping for the best. I don't want to "overcook" the yarn and have it loose its softness. I'm going to let it sit overnight and rinse and dry in the am.

Friday, March 25, 2005

A Slow Knitting Week....

Well, as the Easter Bunny's humble assistant I've had a busy non-knitting week. I also find it difficult to post to my blog, knit, and blow my nose at the same time. I have a rotten cold. Some of my children have the "rotten cold". Therefore, my mother will not find her socks in her Easter Basket. She keeps assuring me they are nice fall colors. Hopefully I will have them done before fall.

Sunday, March 20, 2005


Well, I found the brightest yarn I could at my LYS for my sock swap partner. There should be enough left over to make me a pair also. Now, I just need to find a pattern. Posted by Hello

My first attempt at spinning. I had a lesson from Kate at my LYS. Posted by Hello

Saturday, March 19, 2005

I-Cord Purse Handle Tips

I always make the cord 45-60" long. It can be cut after felting, but you are out of luck if it's too short. I only do 3-4 stitch wide i-cord for handles that are thread through buttonholes. I usually make the i-cord on smaller needles than I did the purse. The handles will stretch some. I think the fatter the i-cord the more they will stretch. And no, those handles do not go with that purse. I just couldn't see the handles well enough in the pictures that coordinated with the purses, so I swapped handles.

Or, you can carry it as a shoulderbag or put it over the stroller handle. Posted by Hello

You can carry it as a handbag. Posted by Hello

Step 3: Tie those knots Posted by Hello

Step 2: Thread second i-cord through bag starting on other side of bag. Posted by Hello

Step 1: Thread single i-cord through all 8 buttonholes and knot on end. Posted by Hello

I-cord handles - 2 i-cords threaded through 8 buttonholes. Each cord knotted to itself on an end. This is the handles pulled double so that you can carry it as a handbag. I used one set of purse handles from another bag so they would be easier to see. Posted by Hello

Friday, March 18, 2005


Knit Picks Sock Garden Geranium in Peaks 'n' Valleys Pattern from Knit Socks. 1 down and 1 to go. Posted by Hello

French Market Bags with handle changes. The red bag is Naturgarn (bulky) done 1/2 size and the purple bag is Peruvian wool from Elann in grape with grey peruvian and the other stripes were Lamb's Pride. It is also 1/2 size and perfect for carrying little projects like socks. Posted by Hello

Thursday, March 17, 2005


Well, I'm all set to spin and dye. Now, I just need the courage and the time to get started. Posted by Hello